.NET 6.0 - CRUD API Example and Tutorial
This tutorial gives you step by step implementation of creating CRUD operations using ASP.NET Web API Core.
This tutorial builds API for its clients to manage employee. it shows how to configure the SQL server connection to manage CRUD operations in real-time applications.
Let's start step by step.
1. Create ASP.NET Web API Project
Open your Visual Studio and select New Project from File Menu.

Now enter the name of the application and click next.

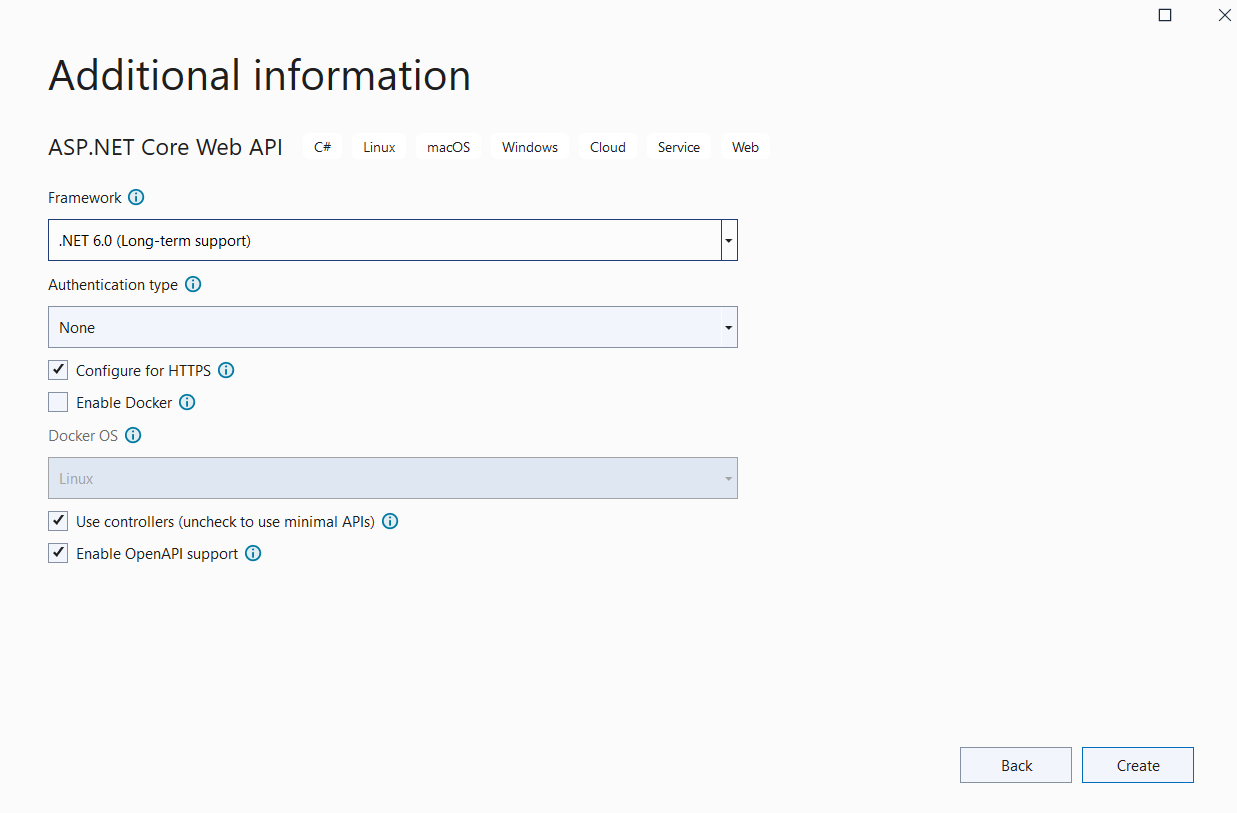
Next select framework .net 6 from drop down and enable open API (Swagger) support and click on create to create default project template for API.
2. Now Add Model to Employee Web API
In this step, you will add the Employee Model Class which will define database entity.
Right click on the project from solution explorer and select Add -> New Folder. Enter folder name as Models.
Right click on the Models folder and select Add -> Class and add class file with name Employee.cs.
Now you can add Employee model properties as shown below.
using System.ComponentModel.DataAnnotations;
using System.ComponentModel.DataAnnotations.Schema;

namespace EmployeeWebAPI.Models
{
    public class Employee
    {
        [Key]
        [DatabaseGenerated(DatabaseGeneratedOption.Identity)]
        public int EmpId { get; set; }

        public string? FirstName { get; set; }

        public string? LastName { get; set; }

        public string? Email { get; set; }

        public string? PhoneNumber { get; set; }
    }
}
3. Create Database Context File
Database context file is main class file that is connect application to database.
Before add DB Context file you need to add microsoft.entityframeworkcore.sqlserver package using nuget package manager
Add a new class file with name EmpDBContext.cs to Models folder and add the below code.
using Microsoft.EntityFrameworkCore;

namespace EmployeeWebAPI.Models
{
    public class EmpDBContext : DbContext
    {
        public EmpDBContext(DbContextOptions<Empdbcontext> options)
        : base(options)
        {

        }

        protected override void OnModelCreating(ModelBuilder modelBuilder)
        {
            base.OnModelCreating(modelBuilder);

            modelBuilder.Entity<Employee>().ToTable("Employee");
        }


        public DbSet<Employee> Employee { get; set; }
    }
}
4. Add Web API Controller
Web API Controller is responsible for accepting the client's HTTP request, process request through Action methods and return the result.
Right click on Controllers folder, select Add -> Controller. You will see Add Scaffold dialog box, select API Controller - Empty name it as EmployeeController.cs and click Ok
using EmployeeWebAPI.Models;
using Microsoft.AspNetCore.Mvc;

namespace EmployeeWebAPI.Controllers
{
    [Route("api/[controller]")]
    [ApiController]
    public class EmployeeController : ControllerBase
    {
        private readonly EmpDBContext _EmpDBContext;

        public EmployeeController(EmpDBContext EmpDBContext)
        {
            _EmpDBContext = EmpDBContext;
        }

        [HttpGet]
        public IActionResult Get()
        {
            return Ok(_EmpDBContext.Employee.ToList());
        }


        [HttpGet("{id}")]
        public IActionResult Get(int id)
        {
            return Ok(_EmpDBContext.Employee.FirstOrDefault(c => c.EmpId == id));
        }


        [HttpPost]
        public IActionResult Post([FromBody] Employee employee)
        {
            _EmpDBContext.Employee.Add(employee);
            _EmpDBContext.SaveChanges();

            return Ok("Employee created");
        }


        [HttpPut]
        public IActionResult Put([FromBody] Employee employee)
        {
            var emp = _EmpDBContext.Employee.FirstOrDefault(c => c.EmpId == employee.EmpId);

            if (emp == null)
                return BadRequest();

            emp.FirstName = employee.FirstName;
            emp.LastName = employee.LastName;
            emp.Email = employee.Email;
            emp.PhoneNumber = employee.PhoneNumber;

            _EmpDBContext.Employee.Update(emp);
            _EmpDBContext.SaveChanges();

            return Ok("Employee updated");
        }


        [HttpDelete("{id}")]
        public IActionResult Delete(int id)
        {
            var emp = _EmpDBContext.Employee.FirstOrDefault(c => c.EmpId == id);

            if (emp == null)
                return BadRequest();

            _EmpDBContext.Employee.Remove(emp);
            _EmpDBContext.SaveChanges();

            return Ok("Employee deleted");
        }
    }
}
Implement GET Method using HttpGet
In this step, you will implement a GET Web API to read Employee details. Get methods can be used to get all employees depending on filters or get specific employee.
[HttpGet]
public IActionResult Get()
{
    return Ok(_EmpDBContext.Employee.ToList());
}


[HttpGet("{id}")]
public IActionResult Get(int id)
{
    return Ok(_EmpDBContext.Employee.FirstOrDefault(c => c.EmpId == id));
}
Implement Post Method using HttpPost
The HTTP POST method is used to create a new record in the data source in the RESTful architecture.
So Put action method in our EmployeeController to update an existing employee record in the database using Entity Framework.
[HttpPost]
public IActionResult Post([FromBody] Employee employee)
{
    _EmpDBContext.Employee.Add(employee);
    _EmpDBContext.SaveChanges();

    return Ok("Employee created");
}
This code accepts HTTPPost requests. [FromBody] attribute says use details of the new employee from the HTTP request body. It creates a new employee using DbContext to the database.
Implement Put method using HttpPut
The HTTP PUT method is used to update an existing record in the data source in the RESTful architecture.
So Put action method in our EmployeeController to update an existing employee record in the database using Entity Framework.
[HttpPut]
public IActionResult Put([FromBody] Employee employee)
{
	var emp = _EmpDBContext.Employee.FirstOrDefault(c => c.EmpId == employee.EmpId);

	if (emp == null)
		return BadRequest();

	emp.FirstName = employee.FirstName;
	emp.LastName = employee.LastName;
	emp.Email = employee.Email;
	emp.PhoneNumber = employee.PhoneNumber;

	_EmpDBContext.Employee.Update(emp);
	_EmpDBContext.SaveChanges();

	return Ok("Employee updated");
}
As you can see in the above figure, HTTP PUT request includes Employee object into JSON format in the request body. After successfull execution the request it'll return Employee updated response.
Implement Delete method using HttpDelete
The HTTP DELETE request is used to delete an existing record in the data source in the RESTful architecture.
So Delete action method in our EmployeeController to delete an existing employee record in the database using Entity Framework.
[HttpDelete("{id}")]
public IActionResult Delete(int id)
{
	var emp = _EmpDBContext.Employee.FirstOrDefault(c => c.EmpId == id);

	if (emp == null)
		return BadRequest();

	_EmpDBContext.Employee.Remove(emp);
	_EmpDBContext.SaveChanges();

	return Ok("Employee deleted");
}
As you can see above, Delete action method includes an id parameter of int type because it just needs an id to delete a record. It fetches an existing employee from the database that matches with the specified id and then marks its status as deleted. This will delete a employee from the database.
5. Add Connection String
Now in this step you need to add connection string in appsettings.json file to connect with database as shown below.
{
  "ConnectionStrings": {
    "DefaultConnection": "Server=yourservername;Database=Test;Trusted_Connection=Employee;User ID=yoursqlusername;Password=yoursqldatabasepassword;"
  },
  "Logging": {
    "LogLevel": {
      "Default": "Information",
      "Microsoft.AspNetCore": "Warning"
    }
  },
  "AllowedHosts": "*"
}
Now add EmpDBContext.cs class as service to the container in Program.cs file. So you can use that service in your controller as dependency injection. Here you can see how Program.cs look like after you added code.
using Microsoft.EntityFrameworkCore;
using EmployeeWebAPI.Models;

var builder = WebApplication.CreateBuilder(args);

// Add services to the container.

builder.Services.AddDbContext<EmpDBContext>(options =>
{
    options.UseSqlServer(builder.Configuration.GetConnectionString("DefaultConnection"));
});

builder.Services.AddControllers();
// Learn more about configuring Swagger/OpenAPI at https://aka.ms/aspnetcore/swashbuckle
builder.Services.AddEndpointsApiExplorer();
builder.Services.AddSwaggerGen();

var app = builder.Build();

// Configure the HTTP request pipeline.
if (app.Environment.IsDevelopment())
{
    app.UseSwagger();
    app.UseSwaggerUI();
}

app.UseHttpsRedirection();

app.UseAuthorization();

app.MapControllers();

app.Run();
6. Run Project
Now run your project and it'll look like as below.

The tutorial offers a practical introduction to building CRUD operations with ASP.NET Web API Core and .NET 6.0. I like the step-by-step approach, especially the explanation of creating the API project, selecting the .NET 6 framework, and enabling OpenAPI (Swagger) support. This gives beginners a clear starting point for developing and testing an API.
ReplyDeleteThe SQL Server integration is also useful because it connects the CRUD concepts to a realistic employee-management scenario. Creating an Employee Model inside a dedicated Models folder is a simple organizational practice that can make the project easier to maintain as more entities and API functionality are added.
For developers interested in building complete applications, understanding how an ASP.NET Core backend exposes data and handles CRUD operations is an important foundation. It becomes especially valuable when the API is later connected to a frontend application through an ASP.NET Core Angular Full Stack Online Training workflow.
Overall, the tutorial focuses on learning by building rather than only explaining theory. Following the project from API creation toward database-backed employee management can give learners practical experience with the core structure of a Dot Net Full Stack Online Training project.
ReplyDelete